INTRODUCTION
As the global economy increases and companies leverage workforces across different countries and time zones, the need to use and translate foreign currency transactions into a local currency is becoming more commonplace. Organizations require transactions for purchases, bills, sales orders, invoices, and other partner-facing transactions to use foreign currency while still reporting financial results in local currency. This week’s blog will talk about how to set up multiple currencies.
PROCESS
For this scenario, it is essential that companies use the Multi-Currency feature in NetSuite tool. With this feature, they can easily price their products and services in different currencies.
Steps for Setting up Multiple Currencies in NetSuite:
- Enable multiple currencies feature
- Create currency records
- Set base currency
- Assign multiple currencies to customers
Enabling Multiple Currencies Feature:
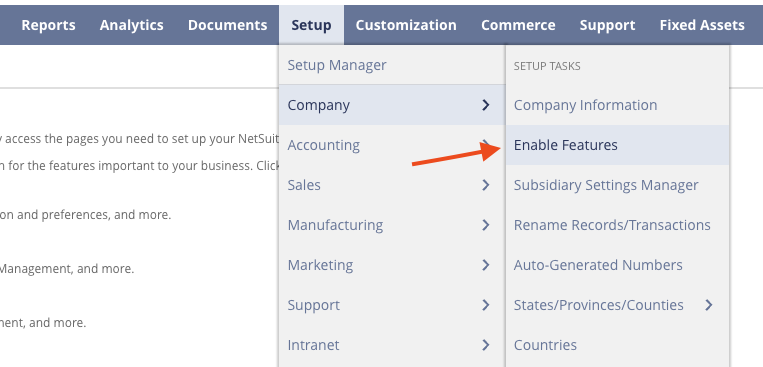
Go to Setup > Company > Enable Features

Select “Company’ subtab and check the “Multiple Currencies” check box.

Creating Currency Records:
NetSuite provides default currencies like Canadian, European Union, Great Britain, and US dollars. If your business uses more currencies, you must enable the multiple currencies feature to add additional currencies.
To create a currency record…
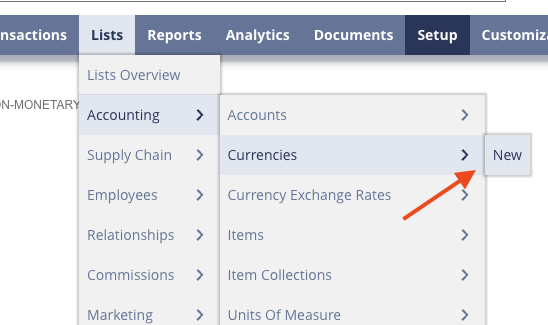
Go to List > Accounting > Currency > New

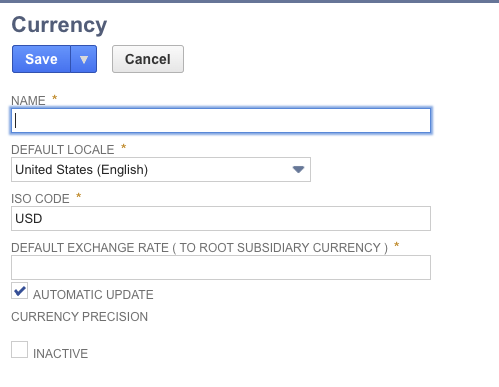
Enter a name for the currency name field and select the automatic update option by checking this box to automatically update the exchange rates by the system. Like many other records in NetSuite, you can also make a currency inactive as long as it does not have open transactions.

Setting Base Currency:
Once you enable the multiple currencies feature, NetSuite initially sets the base currency. If you use NetSuite Oneworld, you can define the base currency per subsidiary. In the currency record the “Is Base Currency” checkbox displays. Once the base currency has been checked, it cannot be edited again.
Assigning Multiple Currencies to Customers:
NetSuite allows you to associate a currency different than your default currency with customers, allowing your organization to transact in your customers’ default currency. To set this up navigate to…
List > Relationships > Customers > New

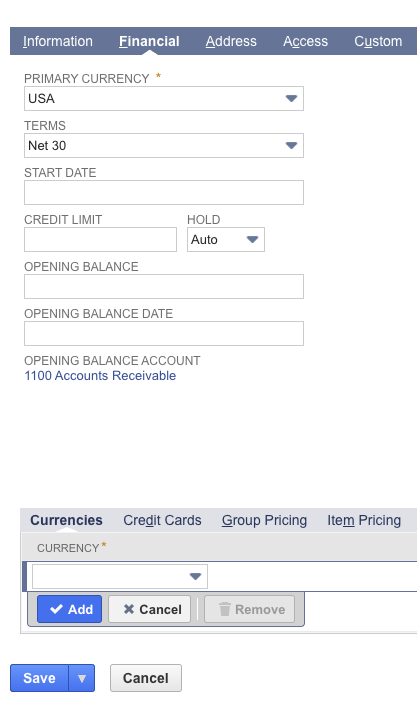
Open the customer record and go to the financial subtab after assigning multiple currencies to the customer.

Select the drop-down arrow and pick a currency. Then click Save.

If you are facing any issues with this process, connect with NetSuite experts, they will be happy to help you in every way possible.
CONCLUSION
With the Multiple Currency feature, you can easily create transactions with entities (customers, vendors, and employees) using their native currency. NetSuite relies on the end of each month’s accounting processes to update the open balance for a subsidiaries non-default currencies.
About Us
We are a NetSuite Solutions Partner and reseller with 30+ years of combined experience. We specialize in implementation, optimization, integration, rapid project recovery and rescue as well as custom development to meet any business need. If you would like more information on NetSuite or are in need of consultation for your project or implementation, feel free to contact NetSuite support.
To Contact Us ClickHere


