Introduction:
There are many forms in NetSuite and NetSuite tools, and they all have a specific function. There are some capabilities that are simply not available out of the box. Tracking the number of times a form’s data has been revised or updated is a notable example of functionality that could be used in many places across NetSuite. However, this function must be custom-built.
Overview:
Building custom functionality usually has several approaches that can yield the same result. There are also varying amounts of time and effort involved in certain executions. Deciding what combination of solutions and the time needed to implement the selected solution is all part of a consultant’s job. This post will provide an outline of steps for an MVP (Minimum Viable Product) remedy for capturing revisions made to a Purchase Order.
Path:

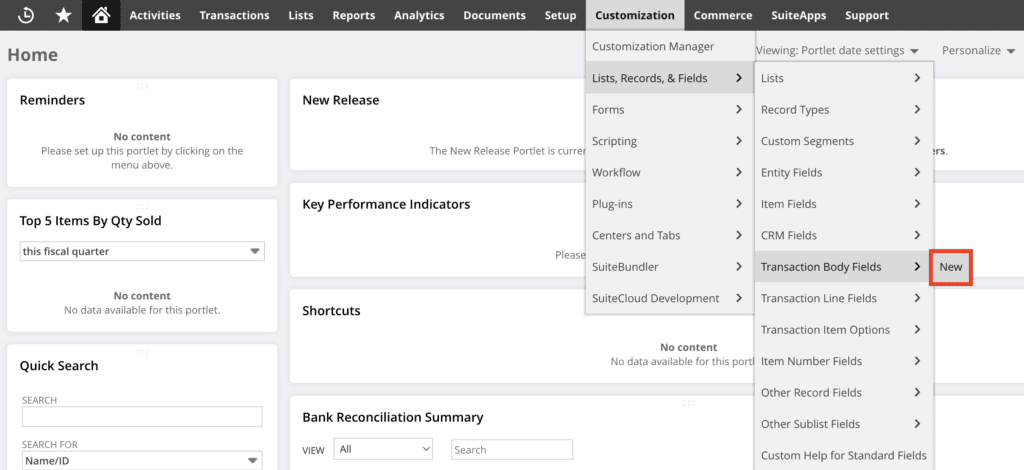
First, navigate to the Transaction Body option from the Administrator center using the path shown above and select the New option. There are two options for transaction fields: body and line. Body fields are displayed at the top or main section of the form. Line fields are found under the specified subtab, in which a column of data will appear, including information pertaining to a list item. By clicking New, a form will display where all the characteristics can be provided for the new custom transaction body field. Provide values for the label, and description if desired, then select Integer Number as the value for the Type field. Under the Applies To tab, select Purchase. This selection will make this custom field available to all purchase forms. Under the Display tab, select Main in the list provided under Subtab. Finally, select the Save button to complete the creation of the field.
Transaction Body Field Form:

Field Display Subtab:

Now, navigate to the Transaction Forms list using the path listed below. Select the Purchase Order that needs to be edited to include the revision functionality. This can mean editing the Standard form provided by NetSuite or creating a custom one. While on the edit page of the Custom Transaction Form, select the Screen Fields subtab to view and assign settings to the available fields. Find the field created in the previous step and make sure both the Show and Mandatory boxes are checked, in addition to the Field Group being set to Primary Information. Once the settings are confirmed, click the Save button.
Path:

Screen Fields:

Screen Field Settings:

Now that the custom field has been created, and the Purchase Order transaction form has been edited to include the mandatory Number of Revisions field, it is time to test. Try to create and save a Purchase Order without providing an integer value for the field. If successful, a pop-up message should state that the field is required. Then, provide an accurate value and successfully save the form. The Purchase Order should now be displayed with the custom field populated.
If you are facing any problem during these steps, you can connect with NetSuite experts, they will be happy to help you in every way possible
Mandatory Field:

Final Form Output:

Conclusion:
NetSuite has many features but not always the unique ones needed to solve equally varying problems. Creating custom fields and applying them to custom forms only takes minutes but can still provide solutions. These implementations can always be revisited and enhanced.
About Us
We are a NetSuite Solutions Partner and reseller with 30+ years of combined experience. We specialize in implementation, optimization, integration, rapid project recovery and rescue as well as custom development to meet any business need. If you would like more information on NetSuite or are in need of consultation for your project or implementation, feel free to contact our NetSuite support.
To Contact Us ClickHere


