


Introduction
Effective demand planning plays a vital role in ensuring that businesses maintain the right balance of inventory, allowing them to meet customer demand efficiently while minimizing costs associated with overstocking or stockouts. In today’s competitive market, the ability to anticipate future product needs is essential for staying ahead, and NetSuite provides a powerful platform to help businesses achieve this. By leveraging demand plans within NetSuite, companies can forecast and plan inventory needs based on historical data, trends, and other predictive models, ensuring that inventory levels are optimized and aligned with customer demand.
This blog will guide you through the two primary methods for creating and updating demand plans in NetSuite: directly through the user interface (UI) and by importing demand forecasts via CSV files. Both methods allow businesses to tailor their demand planning process to their specific needs, whether you’re making real-time updates in the UI or importing detailed forecasts from external systems. By understanding how to effectively use these tools, you’ll be better equipped to plan inventory, reduce excess stock, prevent stockouts, and enhance overall supply chain efficiency. This blog provides a step-by-step walkthrough to help you navigate the process, regardless of whether you’re new to demand planning in NetSuite or looking to streamline your current process.
Creating a Demand Plan from the UI
The quickest way to generate a demand plan in NetSuite is directly through the user interface. Follow these steps to create a demand plan manually:
Steps to Create a Demand Plan – Create a video for the below steps
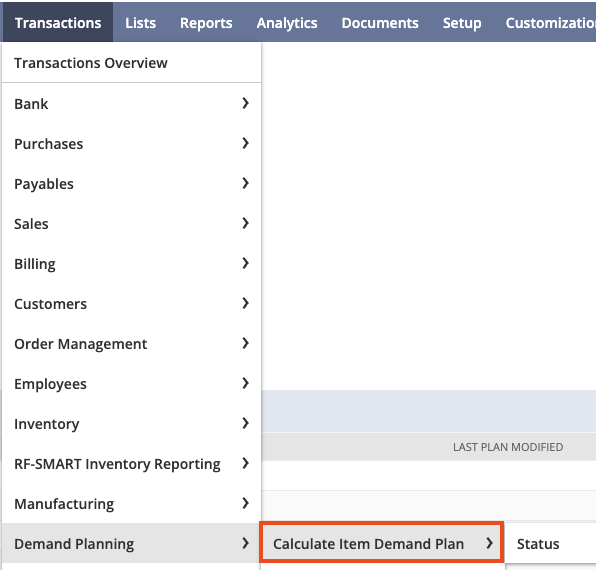
- Navigate to:
- Transactions > Demand Planning > Calculate Item Demand Plan
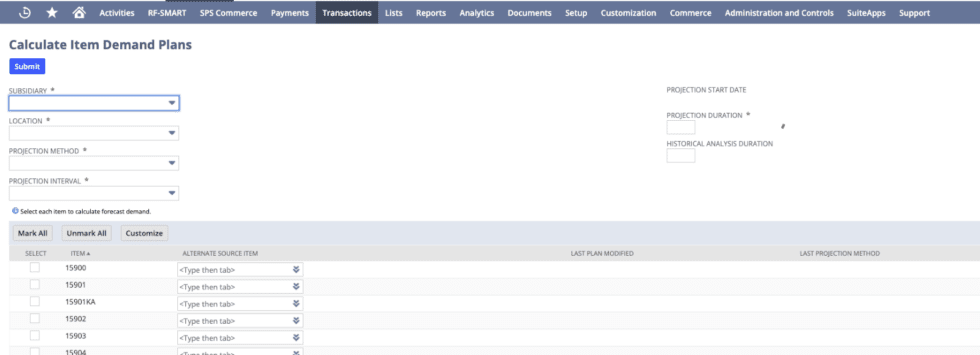
- Enter the Required Details:
- Subsidiary: Select the subsidiary that this demand plan applies to.
- Location: Choose the location for which you want to generate the demand plan.
- Projection Method: You can choose between several projection methods:
- Linear Regression: this uses past sales data to project future demand.
- Moving Average: this Averages past demand over a set period.
- Sales Forecast: this bases projections on existing sales forecasts.
- Seasonal Average: this accounts for seasonal fluctuations in demand.
- Projection Interval: Sets how frequently the projections are calculated, either weekly or monthly.
- Projection Duration: this is where you specify the number of periods to calculate projected future demand.
- Historical Analysis Duration: This is used to calculate the moving average demand for a given period.
- Mark all Items to calculate the forecast demand.
- Click Submit/Save:
After creating a demand plan for items in NetSuite, you can view the results in several places:
- Item Record:
- Go to the item record for which you created the demand plan.
- Navigate to the Demand subtab. Here, you can view details related to demand plans, including quantities and projected demands based on the plan.
- Reports: The demand plan results can be seen in relevant Supply & Demand reports or Inventory Demand Planning reports. Navigate to Reports > Inventory/Items > Demand Planning Reports to view these details.
Importing Demand Forecast via CSV
For a more scalable approach, especially when dealing with large sets of data, you can import demand forecasts using CSV files. This method allows for easy bulk updates and modifications.
Steps to Import a Demand Plan
- Navigate to:
Setup > Import/Export
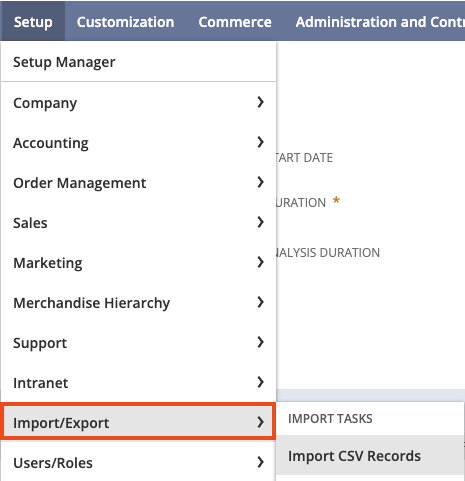
- Select Import Type:
Choose Transactions
- Select the Record Type
Item Demand Plans
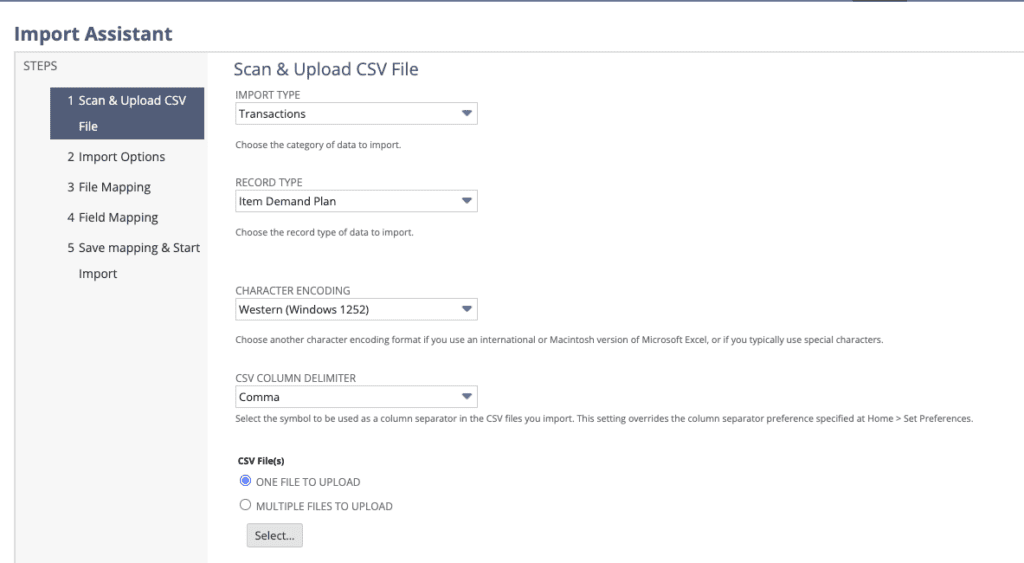
- Upload the File:
- Map the Fields if necessary:
- For forecast mapping, select Item Demand Plan.
- If you need to add a forecast for multiple periods, click the + option on the mapping screen.
- Click Save and Run:
After mapping, save the changes and run the import.
In your import file, include the Item Demand Plan Internal ID as a field.
Conclusion
Demand planning in NetSuite offers the flexibility to manage inventory either manually or through efficient data imports, depending on your business requirements and preferences. Both methods provide robust tools for ensuring that your inventory levels are aligned with customer demand, helping you avoid stockouts or overstocking. Whether you’re setting up demand plans from scratch, refining your forecasts, or updating existing plans, following the outlined steps will empower you to maintain complete control over your inventory
About Us
We areNetSuite Solutions Providerswith 30+ years of combined experience. We specialize in implementation, optimization, integration, rapid project recovery and rescue as well as custom development to meet any business need. Although every business is unique, with 40+ NetSuite clients over the last 5+ years our NetSuite Consultants have most likely seen your challenge or created a similar solution. If you would like more information on NetSuite or just have questions on your project, feel free to contact usHere.