


INTRODUCTION
If you run an eCommerce business, integrating your Shopify store with NetSuite can greatly simplify your business operations. By doing so, you can automate the synchronization of product and inventory data as well as streamline order management between the two systems. The NetSuite Connector SuiteApp is a powerful tool that can help you achieve this integration with ease.
In this blog series, we will guide you through the steps required to install and configure the NetSuite Connector SuiteApp for use in synchronizing product and quantity data, as well as, order data between your Shopify and NetSuite accounts. In this installment, we will cover the steps required to create API Secret and Access Tokens, how to establish the connection, and how to authorize your Shopify store from within the NetSuite Connector interface.
PROCESS
Step 1: Install the NetSuite Connector SuiteApp
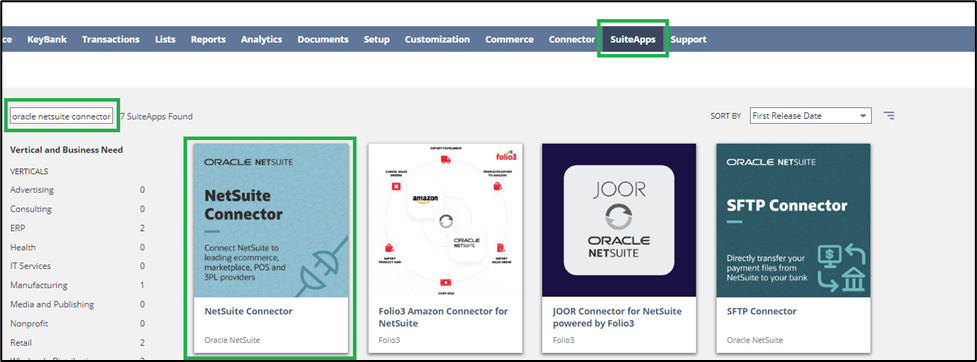
The first step in integrating your Shopify store with NetSuite is to install the NetSuite Connector SuiteApp. You can do this by logging in to your NetSuite account, clicking on the ‘SuiteApps’ menu option, and searching for ‘Oracle NetSuite Connector ‘. From the apps that return, select the official Oracle NetSuite Connector app and click the Install button on the top right.

Step 2: Create API Secret and Access Tokens
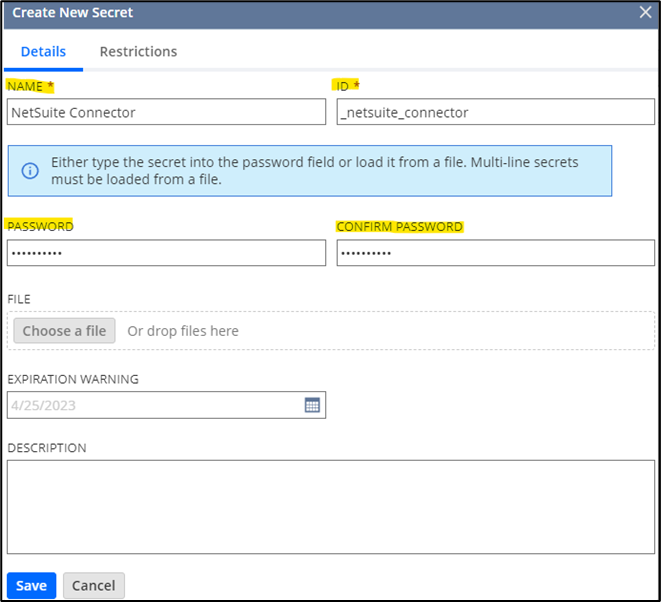
To create API Secret in NetSuite, navigate to Setup -> Company -> API Secrets. This will display any existing API Secrets that may already exist. To create a new secret, click on the Create New button. This will open a new wizard form where you will enter the following values on the Details tab for the secret:
- Name – The name of the secret.
- ID
- Password – Typically use the password you will use to connect to the Netsuite Connector
- Confirm Password
On the Restrictions tab, you can select the following:
- Owner(s) for the Secret
- Check the box to Allow for All Scripts access or you can enter specific scripts available to the secret.
- Check the box for all Domains access or you can select specific domains available to the secret.
Once you have finished this, you can click the Save button.
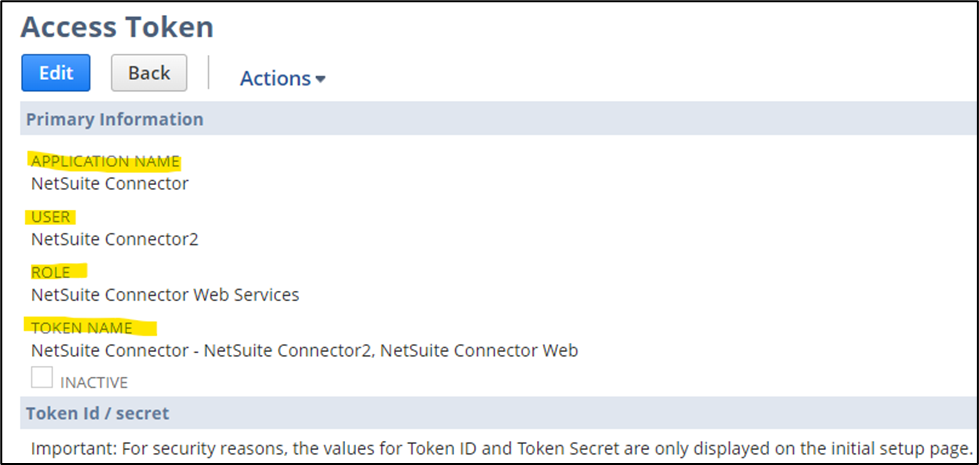
To create the Access Token in NetSuite, navigate to Setup -> Users/Roles -> Access Tokens -> New. Select the values for the following fields:
- Application Name – NetSuite Connector
- User – Select a User from NetSuite that contains either Admin or NetSuite Connector roles. Typically, it is a good idea to create a separate user in NetSuite that is only used for integrations.
- Role – NetSuite Connector Web Service
- Token Name – Autogenerated from the previous selections
NOTE: Once you have made your selections, the Token Secret and Token ID are displayed at the bottom of the screen for one time only. It is important to save this information for use later on.
Step 3: Establish the Connection in the NetSuite Connector Interface
Now that you have the API Secret and Access Tokens created, you can establish a connection between the NetSuite connector and NetSuite.
- Navigate to https://app.farapp.com.
- Login to the account with administrative privileges.
- From the menu of the lefthand side, drill into NetSuite -> Settings -> Credentials
- Enter the NetSuite account #
- NetSuite Token ID
- NetSuite Token Secret
- Click Save and Test Connection
Once this step is completed, you will receive a success message that you are now connected to NetSuite from the Connector. If you do not receive a successful message, review the previous steps completed.
Step 4: Authorize the Shopify Store from Within the Connector
After you have established your connection to NetSuite from inside the NetSuite Connector, you will need to authorize your Shopify store from within the NetSuite Connector interface. To do this, drill down on the NetSuite Connector menu to Shopify -> Settings -> Credentials. Enter the store’s name which is the subdomain found in the following URL example, storename.myshopify.com, and click on the ‘Authorize Shopify’ button. You will then be redirected to Shopify, where you will need to enter your login credentials and grant permission for the NetSuite Connector to access your Shopify store. Shopify will ask you to install the NetSuite connector app into the store itself. Once this is complete, your Shopify Store connection is authorized and ready for sync mapping.
If you need any further information on these steps, feel free to connect with NetSuite experts, they will be happy to help you in every way possible.
CONCLUSION
In our next NetSuite connector blog, we will examine some of the specific mappings and options available to properly use the Order, Product, and Refund syncs between your store and NetSuite.
About Us
We are a NetSuite Solutions Partner and reseller with 30+ years of combined experience. We specialize in implementation, optimization, integration, rapid project recovery and rescue as well as custom development to meet any business need. If you would like more information on NetSuite or are in need of consultation for your project or implementation, feel free to contact NetSuite support.
To Contact Us ClickHere